Paint Brush Guide
DESCRIPTION:
The occupation of painting has been around for as long as there has been a desire to cover something up with a brighter or cleaner surface than currently covers it. The Egyptians and Minoans are known to have painted the walls of their houses and other structures with frescoes by applying the pigments on a fresh lime surface. Earth pigments were used by these ancient civilizations because of the alkali and the earth pigments are unaffected by alkali. Egyptian artists covered limestone walls of tombs with layers of plaster before painting. The painting usually consisted of various scenes depicting aspects of the tombs occupants lives and accomplishments. Binders were used in the color mixes to create a bond to the plaster. The paints were produced by mixing ground pigment with animal glue or organic gums. The ancient Greece used wax or wax and resin as well as eggs to help bind the paint to surfaces. The use of color derived from ancient techniques is remarkable considering the materials available.
The applying of paint in solid color coatings as opposed to the fine decorative techniques used in early times seems to have been evident as early as the 1200’s and probably goes back further than that although the evidence is mostly absent. The fourteenth century is the period that house painting is recorded to have become accepted in society. England developed “guilds” that specialized in house painting and regarded their paint mixing and application skills to be highly guarded secrets.
Demand for interior painting soon followed the practice of exterior painting and mixtures of wide varieties of materials were used. Many homes were elaborately decorated with lifelike murals of the sky, stones and landscape features painted on the walls and ceilings. Painting tools were very similar to what is used today with brushes with wooden handles and various types of hair attached. Many modern brushes use synthetic fibers, but the object is the same, to apply the paint to the surface in appropriate thickness and stroke to achieve the best results. The masking of surfaces where one color meets another has always been an issue, and few people are skilled enough or have the time to create a fine definition of two colors by hand. Various methods have been used throughout the years from paper masks, masking tapes, and other techniques. All of the techniques have the one factor in common in that they are time-consuming and labor-intensive. Often the transition from one color to another is when the painting of surfaces becomes a source of frustration.
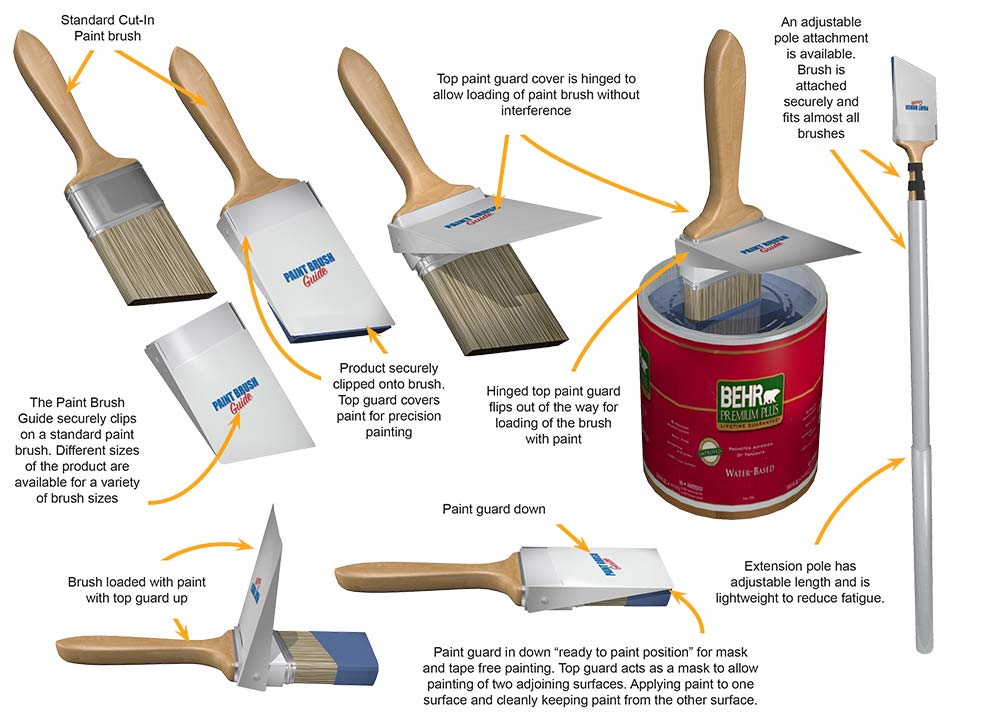
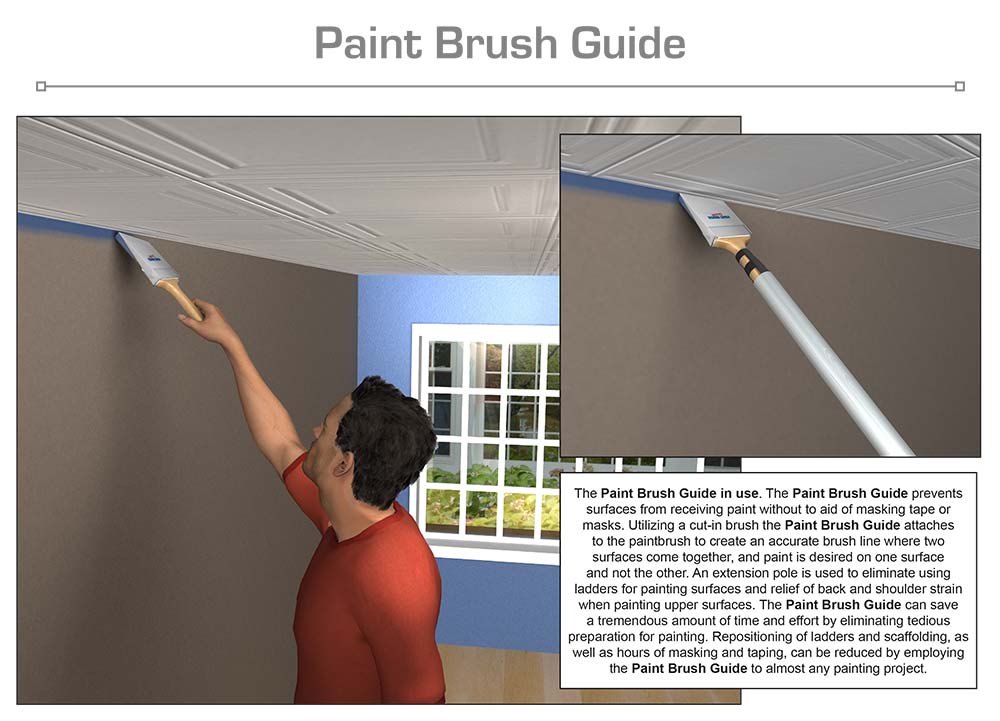
The Paint Brush Guide is an innovative and unique solution to the time consuming and labor-intensive process of creating a clean transition from one color to another when painting walls and ceilings. The Paint Brush Guide consists of a sleeve that fits snugly over the top section of a cut-in or standard paintbrush. Attached to the sleeve is a hinged paint guard designed to create a mask while applying paint to a surface. The paint guard prevents the upper portion of the paintbrush from applying paint to that side of the brush. This configuration is ideal for painting a transition section of a wall such as a wall to ceiling juncture. The Paint Brush Guide will allow the user to paint an even and clean line between the transition surfaces. The paint is loaded and allowed to flow to one surface while the Paint Brush Guide acts ask as a mask preventing any paint from applying to the other surface. The result is a clean transition line without employing any mask or tape. The hinged paint guard will flip up and out of the way for loading the paintbrush with paint. The hinged paint guard then flips back down to perform its task as a painting mask. The product comes with an extension bar that will eliminate standing on and hauling around ladders to reach high sections. The Paint Brush Guide can help eliminate many hours of prep work from masking or taping on the job. The extension tool can eliminate the hours of standing on and repositioning a ladder, reducing time, back and shoulder stress. The Paint Brush Guide is the ideal product for anyone wishing to save time and stress on a painting project.
SPECIFIC, UNIQUE FUNCTIONS OF INVENTION:
- Fits standard and cut-in paint brushes
- Different sizes for various size brushes
- Clips securely onto paintbrush
- Hinged paint guard flips out of the way for paint loading
- Allows precision transition between two different surfaces or colors
- Extension bar for reaching high surfaces
- Can eliminate using ladders and scaffolding
- Saves preparation time
- Easily removed and reused
- Saves stress on back, shoulders, and other physical points
- Quality materials are durable and washable
PRODUCT COMPONENT CLARIFICATION:
The “Paint Brush Guide” is an innovative commercial and DIY painting product that has been designed to eliminate taping an adjacent wall or ceiling to protect it during painting. The molded plastic guard rides against the adjacent wall or ceiling and protects it from the paint laden bristles, allowing the painter to quickly and easily create a perfect edge at the junction of the walls without having to use tape or other shielding materials. The product fits various types of brushes and is easy to clean between uses.
Currently, there are many pads, edgers, and other devices that are available to the painter. However, each of these has problems during use. This forces the painter, if they are going to produce the optimum job, to tape off the adjoining wall or ceiling to protect it from paint being sprayed, brushed, or rolled on it and to prevent these inadvertent mistakes. Then after the paint is applied, the tape must be stripped off, any damage to the wall repaired, and the paint touched up. The labor and material costs can be exorbitant and may dramatically reduce the profitability of the job.
The “Paint Brush Guide” resolves almost all of these problems by using a molded plastic guide that snaps over the ferrule of the brush and glides along the adjacent wall or ceiling, protecting it while the bristles beneath are allowed to make an optimum edge. The guide flips up out of the way as the brush is being loaded with paint, and flips down against a stop during the application process. No taping or shielding is required. The labor saved in applying the taping, removing the taping after painting, and the tape material cost is significant. The quality of the job is unaffected and typically is improved.
The brush guide: The 2 sections are injection molded from polypropylene plastic. This plastic is very durable, is highly resistant to household and painting chemicals, is easy to clean in soap and water, and is typically used in this type of application. The guide can be supplied in almost any vibrant color, so a distinctive color may be chosen to enhance the product recognition factor, which can dramatically improve the market adoption of the product. The gripper section is designed to grip the ferrule of the paint brush and is supplied to securely fit the brushes in the table below. The guard section is designed to fit either square trim or angled sash brushes in widths accommodated by the gripper section.
The size of the chosen brush will coincide with the type of painting project. The most common brush sizes used for Do-It-Yourself (DIY) projects are 2.5” straight bristle trim brush, and a 2.0” or 2.5” angled bristle sash brush. The “Paint Brush Guides” are sized to fit the following brushes.
| Trim Brush | Straight Bristles | Widths in Inches | |
|---|---|---|---|
| 0.5 | 1.0 | 1.5 | 2 |
| 2.5 | 3.0 | 4.0 | — |
| Sash Brush | Angled Bristles | Widths in Inches | |
|---|---|---|---|
| 1.0 | 1.5 | 2.0 | 2.5 |
| 3.0 | — | — | — |
- As an option: the product can be supplied with a light weight, but durable, adjustable length pole. This pole has adjustable straps with hook and loop fasteners to grip almost any brush handle. Then the “Paint Brush Guide” can be snapped onto the brush and the product used to do edging on the wall near the ceiling without using a ladder.
The Paint Brush Guide is designed to be aesthetic and effective in the application. The relative ease of manufacture and the moderately inexpensive components provide good marketability for the manufacturer. The user benefits from improved quality in edging while significantly reducing labor and material costs, which should provide considerable market interest in the product.
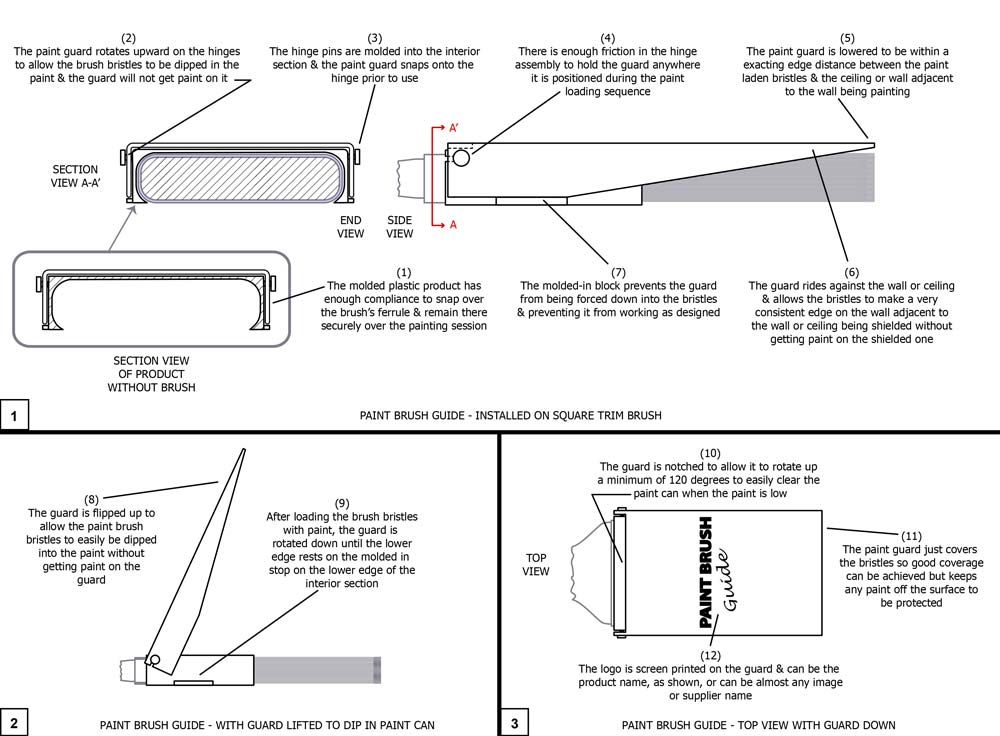
The invention is illustrated in the following drawings of the essential points as explained to us in the documentation.

Drawing 1, Block 1: Paint Brush Guide – Installed On Square Trim Brush
(1) The molded plastic product has enough compliance to snap over the brush’s ferrule and remain there securely over the painting session.
(2) The paint guard rotates upward on the hinges to allow the brush bristles to be dipped in paint and the guard will not get paint on it.
(3) The hinge pins are molded into the interior section and the paint guard snaps onto the hinge prior to use.
(4) There is enough friction in the hinge assembly to hold the guard anywhere it is positioned during the paint loading sequence.
(5) The paint guard is lowered to be within an exacting edge distance between the paint laden bristles and ceiling or wall adjacent to the wall being painted.
(6) The guard rides against wall or ceiling and allows the bristles to make a very consistent edge, on the wall adjacent to the wall or ceiling being shielded, without getting paint on the shielded one.
(7) The molded-in block prevents the guard from being forced down into the bristles and preventing it from working as designed.
Drawing 1, Block 2: Paint Brush Guide – With Guard Lifted Up To Dip In Paint Can
(8) The guard is flipped up to allow the paint brush to easily be dipped into the paint without getting paint on the guard.
(9) After loading the brush bristles with paint, the guard is rotated down until the lower edge rests on the molded in stop on the lower edge of the interior section.
Drawing 1, Block 3: Paint Brush Guide – Top View With Guard Down
(10) The guard is notched to allow it to rotate up a minimum of 120 degrees to easily clear the paint can when the paint is low.
(11) The paint guard just covers the bristles so good coverage can be achieved but keeps any paint off the surface to be protected. The interior section can be moved forward or rearward to fine tune bristle contact while optimally preserving the shielding.
(12) The logo is screen printed on the guard and can be the product name, as shown, or can be almost any image or supplier name. Paint supply companies may want to put their name/logo on the product and use it for a loss leader or promotional give away.
Although a single embodiment of the invention has been illustrated in the accompanying drawings and described in the above detailed description, it will be understood that the invention is not limited to the embodiment developed herein, but is capable of numerous rearrangements, modifications, substitutions of parts and elements without departing from the spirit and scope of the invention.
This document has been prepared for the manufacturer’s elucidation. The manufacturer’s decision makers should consider this product for licensing (providing intellectual property protection for their sales of the product in return for a royalty payment for a period of years) or an outright purchase of the patent for a negotiated fee. The inventor and his team are standing by to consider offers for licensing or outright purchase of the patent.


